How to Use Your MacBook Webcam for Video Calls and Photos
Published: 7 Jan 2025
Are you wondering how to use a webcam on your MacBook? Whether you’re new to your MacBook or just looking to get the most out of its built-in webcam, you’ve come to the right place.
In this article, I’ll explain everything you need to know about using the webcam on a MacBook for video calls, photos, and more. By the end, you’ll be ready to make the most of your MacBook webcam—whether for virtual meetings, video chats, or fun photo sessions. Let’s dive in!
Understanding Your MacBook’s Built-In Webcam
Before diving into how to use your MacBook webcam, let’s take a quick look at what you’re working with.
What is the FaceTime HD Camera?
Your MacBook comes with a FaceTime HD camera. This 720p camera might not be the highest resolution, but it’s perfect for most everyday tasks, such as video calls, Zoom meetings, or quick selfies.
- Why it’s useful: Whether you’re talking to family, attending a meeting, or just snapping a quick photo, your MacBook webcam is always ready to use. No extra hardware is needed.
What Are Its Limitations?
While the FaceTime HD camera offers decent quality, it’s not 4K like some external webcams. But don’t worry! It works well for video chats and casual use.
| Note: |
|---|
If you need higher quality, then you can use an external webcam. For a detailed guide on external webcams, including setup instructions and recommendations, check out our dedicated article: ‘How to Use External Webcams on a MacBook.’ |
For now, let’s focus on how to make the most of your MacBook’s built-in camera
How to Access and Use the Webcam on MacBook
Now, let’s talk about how to actually use the webcam!
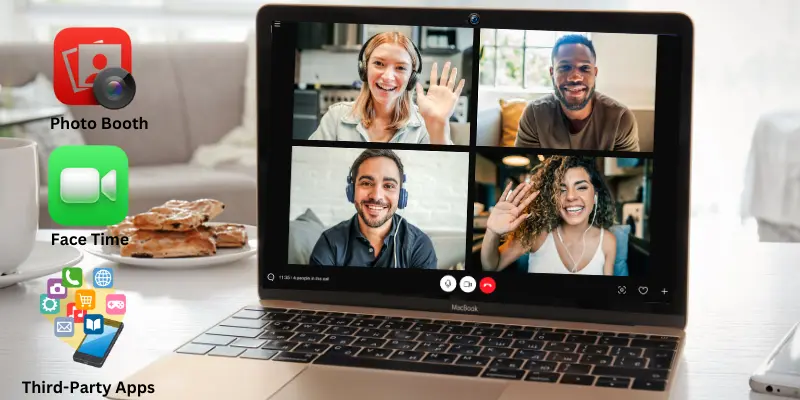
Step 1: Using FaceTime for Video Calls
FaceTime is one of the easiest and quickest ways to use your MacBook’s webcam for video calls. Since it’s pre-installed on your MacBook, you don’t have to worry about downloading any additional apps. Here’s how you can make the most of it:
How to Start a FaceTime Call on Your MacBook:
- Open FaceTime:
- Go to your Applications folder and click on FaceTime. Alternatively, you can search for it quickly by using Spotlight (press Cmd + Space and type “FaceTime” in the search bar).
- Sign In (if needed):
- If this is your first time using FaceTime, you may need to sign in with your Apple ID. If you’re already signed in, you can skip this step.
- Search for a Contact:
- You can either search for a contact by typing their name or email address, or you can dial their phone number (if they’re linked to their Apple ID).
- If the person you want to call is saved in your contacts, their name will show up automatically when you start typing.
- Click the Video Button:
- Once you have selected the person you want to call, click the video button (the camera icon) next to their name or number. This will automatically turn on your MacBook’s webcam and start the video call.
If you need detailed steps to use Webcam on a Macbook Air, check out this guide:
👉 How to Use Webcam on Macbook Air
Why Use FaceTime for Video Calls?
- No Extra Setup: FaceTime is already built into your MacBook, so you don’t need to install anything. It’s ready to use as soon as you open the app.
- Easy to Use: FaceTime is extremely user-friendly, and it connects quickly with other Apple devices (iPhones, iPads, other MacBooks, etc.). Once you start the call, you can talk, chat, or even share your screen with your MacBook webcam.
- Perfect for Apple Users: If the person you’re calling is also using an Apple device, FaceTime is the most seamless and hassle-free option for making video calls.
Step 2: Using Photo Booth for Photos and Videos
Photo Booth is a simple and engaging app that comes pre-installed on your MacBook. It allows you to easily take images and make videos using the MacBook’s webcam. Here’s how to use it:
How to Use Photo Booth:
- Open Photo Booth:
- Find a Photo Booth in your Applications folder or search for it in Spotlight. For quick access, simply press Cmd + Space, type “Photo Booth,” and press Enter.
- Take a Photo:
- When the app opens, click on the camera button at the bottom of the screen. The MacBook webcam will take your photo automatically.
- Record a Video:
- If you want to record a video instead, click the video button next to the camera icon, and to stop recording, simply click the Stop button.
- Apply Effects:
- Photo Booth allows you to apply fun effects to photos and videos. On the left side of the screen, you’ll see a panel with different effects like black-and-white or unique distortions. Click on any effect to instantly change how your photo or video looks.
- Save or Share:
- After you’ve taken your picture or video, a thumbnail will show at the bottom of the screen. Click it to see a preview of your creation. You can save it to your desktop by dragging it or sharing it with others via email or social media.
If you need detailed steps to use Webcam on a Macbook Pro, check out this guide:
👉 How to Use Webcam on Macbook Pro
Why Use a Photo Booth?
- Quick and Simple: Just open the app, and you’re ready to start taking pictures or recording videos.
- Fun Filters: Add creative effects to your photos and videos for extra fun.
- No Setup: There’s no complicated setup. Just open it and start shooting!
Step 3: Using Zoom, Skype, or Other Third-Party Apps
Apps like Zoom, Skype, or Google Meet are perfect for work meetings, school classes, or even chatting with friends. They all use your MacBook’s webcam for video calls. Here’s how to get started:
How to Use Webcam in Zoom (or Other Apps):
- Open the App:
- Launch Zoom, Skype, or whichever app you’re using. You can find these in your Applications folder or search for them using Spotlight.
- Go to Settings:
- Once the app is open, click on the Settings icon. In Zoom, this is usually found in the top-right corner, represented by a gear icon.
- Select Your Webcam:
- In the Video Settings section, choose FaceTime HD Camera as your video source. This will ensure your MacBook webcam is used for the call.
- Join a Call:
- Now, when you join or start a meeting, your MacBook’s webcam will automatically activate, and you’ll be visible to other participants.
Why Use These Apps?
- Seamless Video Calls: These apps are designed for video calls and work perfectly with your MacBook webcam.
- Professional Look: They allow you to look your best in meetings, even when you’re working from home or on the go.
- Extra Features: In addition to video calls, these apps offer features like screen sharing, chat, and recording, making them ideal for remote work and collaboration.
Adjusting Webcam Settings on Your MacBook
Your MacBook’s webcam works well by default, but you can still make changes to increase video quality and control privacy. Here’s how:
Lighting and Image Quality
Good Lighting: The quality of your video depends a lot on lighting. Natural light is the best—try sitting near a window and facing the light. If you’re indoors, use soft, warm lighting. Avoid harsh lighting, which can create shadows or overexposure.
Improving Video Quality:
While macOS doesn’t have built-in advanced webcam settings, you can adjust video quality using third-party apps like OBS Studio or CamTwist. These apps allow you to:
- Adjust brightness and contrast.
- Customize the sharpness and other features of your camera feed.
These features are especially useful when you’re recording or streaming.
Privacy Settings for Your Webcam
You should always control which apps have access to your webcam for privacy reasons. Here’s how to manage that:
- Go to System Preferences:
- Click the Apple menu at the top-left corner and choose System Preferences.
- Select Security & Privacy:
- In the Camera tab, you’ll see a list of apps that have permission to use your webcam.
- Manage App Access:
- To block or allow apps, just check or uncheck the box next to the app. This gives you full control over who can use your webcam.
By adjusting these settings, you can make sure that only trusted apps have access to your webcam.
Troubleshooting Webcam Issues on MacBook
If your MacBook’s webcam isn’t working properly, don’t worry! Most problems are easy to fix. Here are some common issues and solutions:
1. Webcam Not Detected
If your webcam isn’t showing up in apps like Zoom or FaceTime, try these steps:
Restart Your MacBook:
A simple restart can resolve many minor software glitches. After saving your work, restart your MacBook and check if the webcam is now detected.
Check for macOS Updates:
- Outdated software can cause compatibility issues with hardware.
- Go to System Preferences > Software Update and install any available updates. This often fixes bugs affecting the webcam.
2. Poor Image Quality
If your webcam video looks blurry, grainy, or too dark, here’s how to improve it:
Ensure Good Lighting:
Poor lighting is the most common cause of low-quality video. Sit near a natural light source like a window, or use a desk lamp with soft lighting to brighten your space. This helps the webcam capture a clearer image.
Clean the Camera Lens:
Dust or fingerprints on the webcam lens can make the image blurry. Use a microfiber cloth to gently clean the lens. Avoid using harsh cleaners that could damage it.
3. Webcam Not Turning On
If your MacBook’s webcam isn’t turning on at all, these steps might help:
Reset the System Management Controller (SMC):
The SMC controls hardware functions, including the webcam. Resetting it often resolves issues where the hardware isn’t working.
For MacBooks with the T2 Security Chip:
- Shut down your MacBook.
- Hold down Control + Option + Shift on the left side of the keyboard.
- While holding these keys, press the Power button for 10 seconds.
- Release all keys and turn your MacBook back on.
For older models, the steps might vary, so check Apple’s official guide.
Improve Webcam Quality on MacBook
| If you want to improve the video quality on your MacBook’s webcam, try these simple tips: |
|---|
|
Conclusion
Now that you know how to use your MacBook’s webcam, you’re ready to make high-quality video calls, capture fun photos and videos, and attend important virtual meetings. Remember the tips I’ve shared to make sure everything works smoothly.
Remember to clean the lens, adjust the lighting, and review your privacy settings regularly. For even better video quality, consider using external lighting or third-party apps to have more control over your webcam settings.
Ready to improve the quality of your video calls? Explore more tips on optimizing your webcam, or check out our guide on using external webcams with your MacBook.
FAQs
Here are answers to some of the most common questions people have about using their MacBook’s webcam.
How do I turn on my MacBook’s webcam?
Your MacBook’s webcam automatically turns on when you start an app that requires it, like FaceTime or Zoom. Simply open the app, and the webcam will activate. No extra steps are needed to turn it on.
How do I know if my webcam is working?
If your webcam is not working, try opening an app that uses the camera, like FaceTime or Zoom. If it doesn’t turn on, try restarting your MacBook or checking for any software updates. You can also check the Camera section in System Preferences to see which apps have access to the webcam.
Can I use an external webcam with my MacBook?
Yes, you can connect an external webcam to your MacBook via USB. Once connected, most video calling apps will automatically recognize the external camera. You can select it in the app’s settings for better video quality.
Where is the Camera app on MacBook?
There isn’t a separate “Camera” app on MacBook. Instead, your MacBook’s webcam works automatically with apps like FaceTime, Photo Booth, or any third-party video calling app. Just open one of these apps, and your webcam will be ready to use.
How to open a MacBook camera?
To open your MacBook camera, launch an app that requires a webcam, such as FaceTime, Photo Booth, or any video conferencing app like Zoom or Skype. Once the app is opened, the camera will automatically turn on, and you’ll be ready to start using it.


- Be Respectful
- Stay Relevant
- Stay Positive
- True Feedback
- Encourage Discussion
- Avoid Spamming
- No Fake News
- Don't Copy-Paste
- No Personal Attacks
- Be Respectful
- Stay Relevant
- Stay Positive
- True Feedback
- Encourage Discussion
- Avoid Spamming
- No Fake News
- Don't Copy-Paste
- No Personal Attacks
