How to Add a Webcam to Streamlabs and Engage Your Audience
Published: 3 Mar 2025
Adding a webcam to Streamlabs improves stream quality, enhances audience interaction, and makes your setup look more professional. Whether you’re a beginner or an experienced streamer, in this article, I’ll guide you through the process of setting up your webcam in Streamlabs, covering everything from how to add a webcam to Streamlabs to optimizing your webcam settings for the best streaming experience. So, let’s get started
Why Use a Webcam in Streamlabs?
Adding a webcam to your stream isn’t just about showing your face—it’s about creating a stronger connection with your audience. Here’s why a webcam is an important part of your streaming setup:
- Better Engagement: Viewers connect more with streamers who show their faces.
- Professional Look: A webcam makes your stream look polished and high-quality.
- Brand Identity: Helps create a recognizable online presence.
Things You’ll Need
Before getting started, make sure you have the necessary equipment. Having the right tools ensures a smooth setup and high-quality visuals.
- A webcam (built-in, USB, or DSLR).
- Streamlabs software is installed.
- A good lighting setup for a clear video.
- A stable internet connection for smooth streaming.
How to Set Up a Webcam in Streamlabs

Follow these simple steps to integrate your webcam into Streamlabs and improve your live streaming experience.
Step 1: Open Streamlabs
The first step is to launch Streamlabs and log in to your account. Before proceeding, make sure your webcam is plugged in and recognized by your system.
Step 2: Add a Video Source
Your webcam needs to be added as a video source so that Streamlabs can display the feed. To do this:
1. Click on the ‘+’ button under the Sources panel.
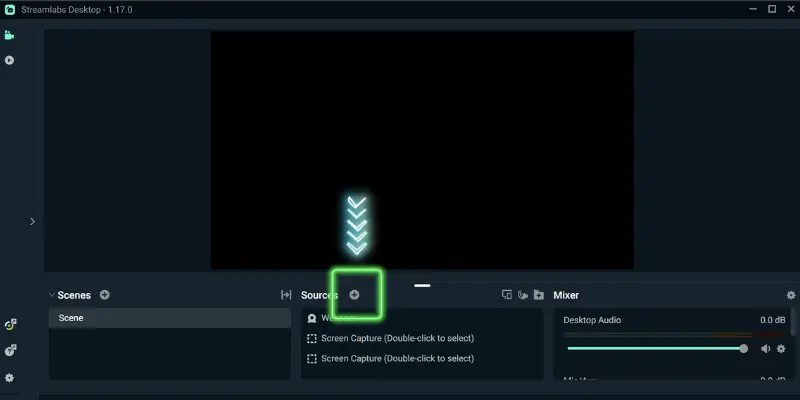
2. From the list of available sources, select ‘Video Capture Device’—this is what Streamlabs calls your webcam feed.

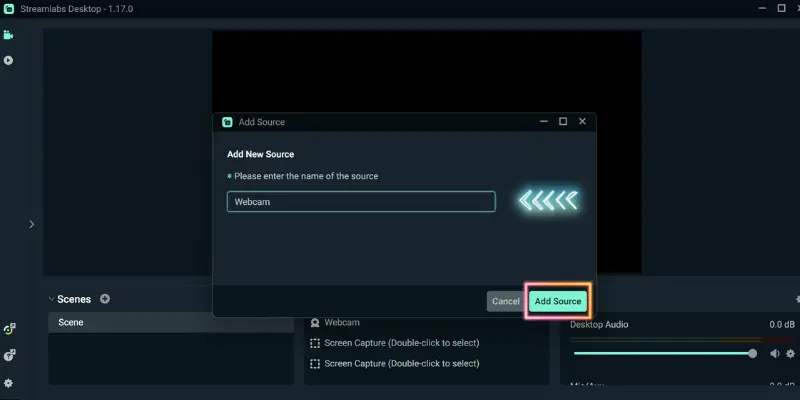
3. Click ‘Add Source,’ which will allow you to set up your webcam.
4. A window will pop up asking you to name this source. You can name it “Webcam”, “Facecam”, or whatever helps you stay organized.
Step 3: Select Your Webcam
Now that you’ve added the video source, it’s time to configure it properly.
1. Choose your webcam from the drop-down menu. If you have multiple cameras (like a built-in and an external webcam), choose which one you want.
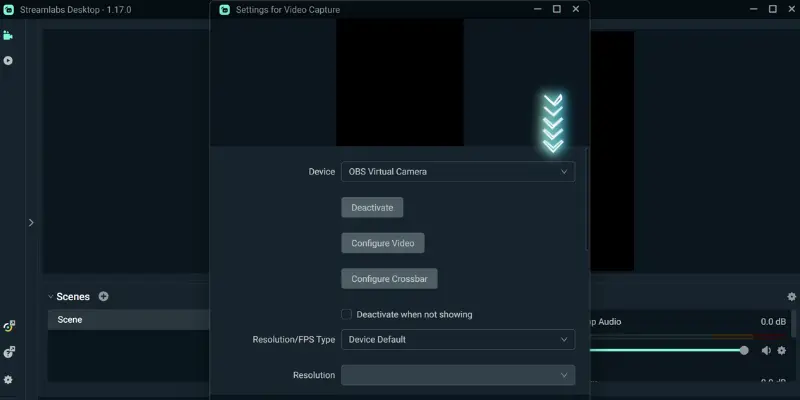
2.Click ‘Done‘ once everything is set.
Step 4: Adjust Webcam Settings
To get the best streaming experience, adjust the webcam settings:
- Resolution & FPS: A 720p or 1080p resolution ensures good quality. Higher FPS (Frames Per Second) results in smoother video.
- Frame Rate: 30 FPS is usually enough, but 60 FPS is better for high-quality, fast-moving streams.
- Brightness & Contrast: Adjust these to balance lighting and reduce grainy pictures.
Step 5: Resize and Position Your Webcam
Your webcam feed should be placed strategically in your stream layout:
- Drag the webcam window to your preferred corner.
- Resize it by clicking and dragging the edges. Make sure it doesn’t block important game elements or content.
Step 6: Add a Webcam Border (Optional)
If you want to add a custom border, Streamlabs allows you to do so:
- Click on your webcam source and select ‘Filters.’
- Look for the ‘Border’ option, where you can change colors, thickness, and design.
This ensures your webcam feed looks polished and stands out on your stream.
Advanced Tips for Better Webcam Quality
Optimizing your webcam settings is key to creating a professional and engaging stream. Here are some professional tips:
How to Flip Your Webcam in Streamlabs
If your webcam appears mirrored, you can easily flip it.
- Right-click on your webcam source.
- Select ‘Transform’ > ‘Flip Horizontal’.
How to Crop Your Webcam in Streamlabs
Want to remove unwanted areas from your webcam feed?
- Hold ALT while dragging the webcam edges to crop the frame.
Best Settings for Smooth Streaming
For lag-free, high-quality webcam streaming:
- Lower the resolution if your stream lags.
- Use good lighting to improve video clarity.
Avoid using backlighting to reduce shadows on your face.
Common Issues and Fixes
Even with a proper setup, webcam issues can arise. Here’s how to fix them:
Webcam Not Showing Up?
If your webcam isn’t appearing in Streamlabs, don’t worry. This issue is common and usually easy to fix. Here’s how to fix it
- Ensure that no other app is using the webcam.
- Restart Streamlabs to refresh the connections.
- Update the webcam drivers.
- Enable camera access in the system settings.
Video Feels Laggy?
A laggy webcam can make your stream look unprofessional. Here’s how to improve its performance.
- Lower the resolution or frame rate.
- Close unnecessary background apps.
- Ensure a stable internet connection.
Streamlabs Virtual Webcam Not Working?
If the virtual webcam feature isn’t functioning, a few adjustments can resolve the issue.
- Update your Streamlabs software.
- Check if the virtual webcam mode is enabled in settings.
- Reinstall the Virtual Webcam driver if needed.
By troubleshooting these issues, you can make sure a smooth and professional streaming experience.
Pro Tips for a More Professional Stream
Want to take your stream to the next level? Consider these advanced tips to improve your setup and engagement:
✔️ Best Camera Positioning
Proper webcam positioning can greatly improve your on-screen presence.
- Position at eye level: This ensures a natural and engaging look for your viewers.
- Avoid looking down: Looking down can make you seem disconnected from your audience.
- Don’t place the camera too close: Keep a comfortable distance for a more balanced and flattering frame.
✔️ Multi-camera setup
Using multiple cameras adds variety and professionalism to your stream.
- Add a second camera: This allows you to show different angles or activities, keeping things dynamic.
- Switch between cameras: Use Streamlabs’ webcam integration to switch angles and keep your audience engaged seamlessly.
✔️ Adding Overlays and Effects
Personalize your stream with custom overlays and visual effects.
- Add a border around your webcam: Customize the frame to fit your branding or theme.
- Filters & Effects: Improve the quality of your stream by adjusting the sharpness, contrast, and color balance for a more polished, professional look.
Conclusion
Adding a webcam to your Streamlabs setup is an easy way to enhance your stream’s quality and engage your audience. By following the steps above, you can optimize your webcam, adjust settings, and create a professional look. Whether you’re just starting or improving your stream, a well-positioned and properly configured webcam will help take your content to the next level. Keep experimenting with your settings, and you’ll soon have a polished and engaging streaming experience.
Happy streaming, and don’t forget to engage with your audience to increase your online visibility!
Frequently Asked Questions (FAQs)
Here are answers to some of the most common questions about how to add a webcam to Streamlabs :
To add a webcam, open Streamlabs, click the + button under the Sources panel, and select Video Capture Device. Choose your webcam from the drop-down menu and click Add Source. You can then configure it and adjust settings like resolution and frame rate.
To overlay your webcam, simply add it as a Video Capture Device in the Sources panel. Once added, drag and resize the webcam feed in your Streamlabs layout, positioning it wherever you want on the screen (e.g., corner, center). You can also add borders and effects for a more polished look.
After you’ve added your webcam as a source, right-click on it in the Sources panel and select Properties. Here, you can adjust settings like resolution, frame rate (FPS), and brightness. For optimal streaming, set the resolution to 720p or 1080p and the frame rate to 30 FPS (or 60 FPS for higher-quality streams).
Most webcams (USB, built-in, or DSLR) are compatible with Streamlabs. Ensure your webcam is recognized by your computer before setting it up in Streamlabs. If it’s not showing up, check that drivers are installed and the camera is connected correctly.
Yes, you can use a DSLR as a webcam, but you’ll need software like EOS Webcam Utility (for Canon) or Logitech Capture to make the connection. Once set up, follow the same steps as for a regular webcam to add it to Streamlabs.


- Be Respectful
- Stay Relevant
- Stay Positive
- True Feedback
- Encourage Discussion
- Avoid Spamming
- No Fake News
- Don't Copy-Paste
- No Personal Attacks
- Be Respectful
- Stay Relevant
- Stay Positive
- True Feedback
- Encourage Discussion
- Avoid Spamming
- No Fake News
- Don't Copy-Paste
- No Personal Attacks
