How to Use a Webcam on XSplit Broadcaster: Complete Guide
Published: 22 Jul 2025
Not sure how to use a webcam on XSplit Broadcaster? You’re not alone! Many streamers struggle with setting up their webcam or optimizing it for the best quality. Whether you’re new to streaming or switching from another platform, we’re here to guide you through the process and help you get your webcam working perfectly with XSplit Broadcaster. So, let’s dive in.
Setting Up Your Webcam on XSplit Broadcaster
Let’s get your webcam set up on XSplit Broadcaster in just a few easy steps.
Step 1: Connect Your Webcam to Your Computer
- Start by plugging your webcam into your computer using a USB cable or any other connection your webcam requires.
- Ensure that the webcam is properly detected by your operating system. You may need to install drivers if it’s a new device.
Step 2: Open XSplit Broadcaster
Next, launch XSplit Broadcaster to prepare for the setup.
- Launch XSplit Broadcaster on your computer. If you haven’t already installed it, download the latest version from the official website.
Step 3: Add Webcam to Your Scene
Now, let’s add your webcam feed to the scene in XSplit.
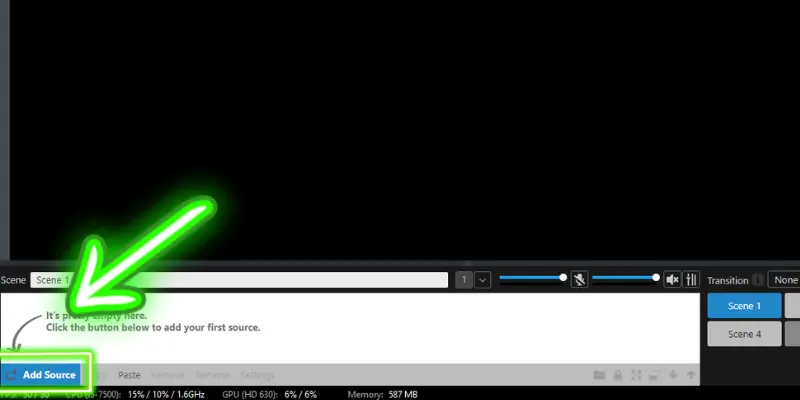
1. Once XSplit is open, click on the “Add Source” button located at the bottom left of the screen.
2. From the list of available sources, select “Camera/Capture Card“.
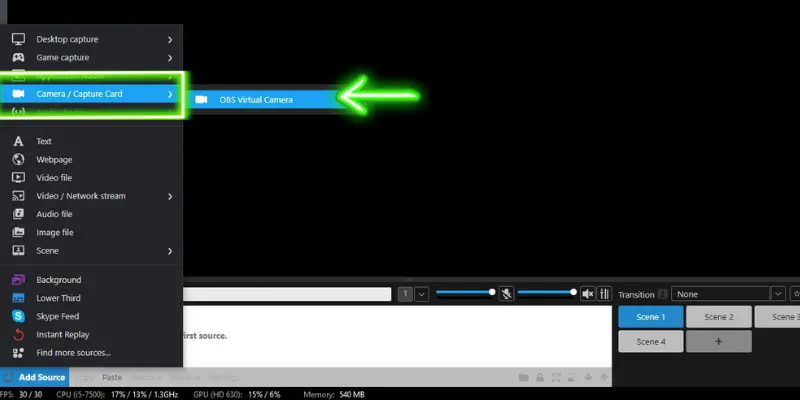
3. A window will appear showing all available webcams connected to your computer. Select your webcam from the list and click “Add“.
Step 4: Optimize Webcam Settings in XSplit
After adding your webcam, you can adjust its settings to get the perfect image.
- Right-click on your webcam source, then choose “Settings.”
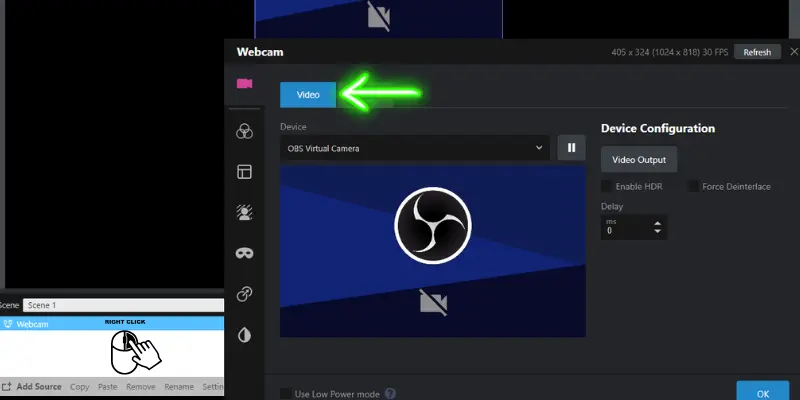
Adjust the following:
- Resolution: Choose the best resolution for your stream (1080p or 720p works well for most).
- Frame Rate: Set the frame rate to 30–60 FPS for smooth video, especially for gaming or fast-paced content.
- Exposure & Gain: Adjust the exposure and gain to improve visibility, particularly in low-light conditions.
Make sure these settings are optimized to avoid lag or blurry images, giving your viewers a smooth and clear stream.
Step 5: Test Your Webcam
Before going live, test your webcam in XSplit’s preview mode. Check for any lag, resolution issues, or syncing problems.
If the video isn’t smooth or clear, go back to the settings and adjust the resolution, frame rate, or exposure until the image is just right.
Advanced Tips for Webcam Optimization
Once your webcam is set up, here are some advanced tips to help you get the best results with XSplit Broadcaster:
1. Use XSplit as a Virtual Webcam
Did you know that you can use XSplit Broadcaster as a virtual camera? This allows you to use your XSplit setup for video calls, presentations, or online meetings. Here’s how to do it:
- Go to the “Playout” menu in XSplit and select “Virtual Camera“.
- Click “Start” to begin streaming your XSplit scene as a virtual webcam.
- In your video conferencing app (Zoom, Skype, etc.), go to the video settings and select “XSplit VCam” as the video source.
2. Adjust Your Webcam for Low-Light Environments
If your webcam video looks dark or grainy, low lighting might be the reason. Try these simple fixes:
- Slightly increase the brightness to make your face clearer. Too much can make the video look grainy.
- Raise the exposure to brighten the video. Be careful—too much can wash out the image.
- Place a ring light or any front-facing light to brighten your face and create a cleaner, more professional look.
These small adjustments can help your webcam perform much better in low-light rooms.
Troubleshooting Common Webcam Issues
If you’re experiencing any problems with your webcam, here are some troubleshooting steps to resolve them:
Webcam Not Detected
If your webcam isn’t appearing in XSplit:
- Make sure the drivers are up to date.
- Double-check that the webcam is properly connected.
- Verify XSplit permissions to access the webcam.
- Restart XSplit to refresh the connection.
Lagging Webcam
If you notice lag during streaming:
- Lower the resolution to 720p for smoother performance.
- Try switching to 30 FPS to reduce lag.
- Free up system resources by closing unnecessary applications.
Blurry Image
If the image is blurry:
- Adjust the exposure settings to improve clarity and sharpness.
- Try adjusting the focus on your webcam (if it has a manual focus ring).
Frequently Asked Questions (FAQs)
Here are answers to some of the most common questions about how to use a webcam on XSplit Broadcaster:
Yes, you can use a DSLR as a webcam by connecting it to your computer through a capture card. Once connected, XSplit will detect it like any other webcam. Make sure you have the necessary software for the DSLR setup.
After opening XSplit, click on “Add Source” and select “Webcam“. Then, choose your webcam from the list of available devices and click “Add” to display it in your scene.
XSplit Broadcaster supports most USB webcams, including popular brands like Logitech, Razer, AVerMedia, and Microsoft. If you’re using a DSLR or a high-end camera, you can integrate it with XSplit using a capture card.
XSplit Broadcaster doesn’t work directly on Mac, but it’s only available for Windows. However, you can use Boot Camp to run Windows on your Mac and then use XSplit. Alternatively, OBS Studio or Streamlabs are better options for Mac users.
Conclusion
Setting up a webcam on XSplit Broadcaster is a simple process that can enhance your streaming experience. By following the steps outlined above, you’ll be able to integrate your webcam into your streams and adjust it for optimal performance. Remember, a webcam is not just a tool; it’s an opportunity to connect with your audience on a more personal level.
We hope this guide has been helpful. Have any questions or tips? Share them in the comments below —we’d love to hear from you!


- Be Respectful
- Stay Relevant
- Stay Positive
- True Feedback
- Encourage Discussion
- Avoid Spamming
- No Fake News
- Don't Copy-Paste
- No Personal Attacks
- Be Respectful
- Stay Relevant
- Stay Positive
- True Feedback
- Encourage Discussion
- Avoid Spamming
- No Fake News
- Don't Copy-Paste
- No Personal Attacks
