How to Set Up a Webcam for Live Streaming Like a Pro
Published: 19 May 2025
Whether you’re an aspiring gamer, a seasoned content creator, or just someone looking to engage with an audience online, live streaming has become one of the most effective ways to connect with people. One of the key elements to a successful stream is having the right webcam setup. A good webcam setup not only improves the visual quality of your stream but also enhances the viewer experience and engagement.
In this guide, we’ll cover everything you need to know about using a webcam for live streaming, from choosing the right camera to optimizing it for the best quality. So, let’s dive in!
1. Choosing the Best Webcam for Streaming
Selecting the right webcam is the first step in setting up your stream. Not all webcams are created equal, and the right choice depends on your streaming needs.
Key Features to Look For:
- Resolution: The higher the resolution, the better the clarity. For most streamers, 1080p is ideal for a sharp and professional-quality video. However, for high-end streaming, consider 4K for enhanced detail.
- Frame Rate: A higher frame rate ensures smoother video. If you enjoy fast-paced games, 60 FPS may be a good choice. However, 30 FPS is typically enough for most live streaming.
- Autofocus & Low-Light Performance: Look for autofocus to keep your face sharp, and good low-light performance for streams in dim lighting.
- Built-in Microphone: While a good microphone is essential for clear audio, some webcams come with built-in mics, which might be useful if you’re just starting out.
Top Webcam Recommendations:
Here are some of the best webcams for streaming:
- Logitech C920: A popular choice for streamers due to its affordable price and excellent performance.
- Razer Kiyo: This webcam comes with an integrated ring light, perfect for users streaming in low-light environments.
- Elgato Facecam: Perfect for streamers looking for a professional setup with ultra-low latency and high customization.
2. Setting Up Your Webcam for Live Streaming
Once you’ve selected your webcam, it’s time to set it up. Don’t worry, it’s not as complicated as it sounds! Follow these simple steps to get started:

Step 1: Install Your Webcam
Plug your webcam into a USB port on your computer. Many modern webcams are plug-and-play, which means they don’t require additional drivers or software. Just wait for your operating system to recognize it.
Step 2: Position Your Webcam
To look your best on camera, it’s important to place your webcam correctly. Here’s how to set it up for a clear and professional appearance.
- Best Webcam Placement: Position your webcam at eye level or slightly above to create a more attractive and natural look for your viewers. This also helps avoid the dreaded “up-the-nose” shot.
- Best Webcam Angles: Aim for a straight-on angle to maintain good eye contact with your viewers. Slightly tilt the camera if you prefer a more dynamic view.
- Background: Keep your background neat and uncluttered. If possible, position yourself in front of a clean wall or use a green screen to add a professional touch.
Step 3: Adjust lighting
Lighting plays a big role in how you look on camera. Use soft light, like a ring light, in front of you to avoid harsh shadows and get even lighting on your face. Don’t sit with bright lights behind you, as that can make you look dark or like a shadow.
3. Integrating Your Webcam with Streaming Software
Once your webcam is physically set up and positioned, the first thing you need to do is integrate it into your streaming software (such as OBS Studio). After this, you can go ahead and stream to platforms like YouTube Live, Facebook Live, or TikTok Live.
Step 1: Add Your Webcam to OBS
- Open OBS Studio and create a new Scene or select an existing one.
- In the Sources section at the bottom, click the + button and select Video Capture Device.
- Choose your webcam from the list of available devices. Your webcam feed will appear as a source in your scene.
- Resize and position the webcam feed where you want it on the screen.
Step 2: Get the Stream Key for Your Platform
Now that your webcam is added to OBS, the next step is to get the Stream Key for the platform you’re streaming on.
For YouTube Live Streaming:
- Log in to YouTube Studio and click the Create button (camera icon) in the top right, then select Go Live.
- In the Stream tab, you’ll see the Stream Key. Copy it. (This allows OBS to broadcast directly to your YouTube channel.)
For Facebook Live Streaming:
- Go to Facebook and click Live Video from your profile or page.
- Go to the streaming software in the Live Producer section and copy the Stream Key shown there. (This links OBS to your Facebook account.)

For TikTok Live Streaming:
- Open TikTok’s live stream settings to get the RTMP URL and Stream Key.
- Copy the Stream Key and the RTMP URL to enter into OBS for TikTok.
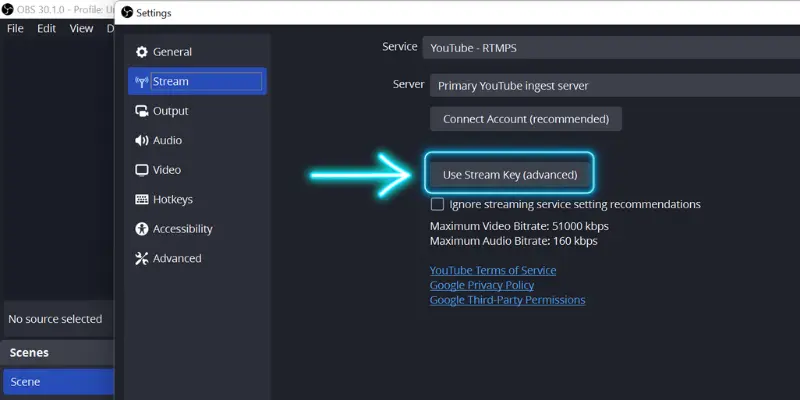
Step 3: Paste the Stream Key into OBS
- In OBS, go to Settings > Stream.
- Under the Stream Type, select the platform you want to stream to (YouTube, Facebook, or Custom for TikTok).
- Paste the Stream Key you copied earlier into the Stream Key area of OBS.
- Click Apply to save your settings.
Step 4: Start Streaming
Now that your webcam is set up and the Stream Key is entered, you can start your live stream.
1. Click the Start Streaming button in OBS. OBS will connect to the platform using the Stream Key you entered.
2. To go live on YouTube, Facebook, or TikTok, follow these steps:
- On YouTube, click Go Live after OBS starts streaming.
- On Facebook, click Go Live on the Live Producer page.
- On TikTok, your stream will start automatically when OBS begins broadcasting.
4. Optimizing Your Stream for the Best Viewer Experience
To provide the best experience for your viewers, ensure that both the audio and video quality are excellent.
- Audio: Clear sound is just as important as video. Use a good-quality microphone like the Blue Yeti or Audio-Technica AT2020. Also, check that your microphone is in sync with your webcam to avoid delays between audio and video.
- Background & Ambience: If you’re using a green screen, make sure it’s well-lit and free of wrinkles to prevent visual glitches. Good lighting helps your background look smooth and professional.
- Streaming Setup: Try to stream in a clean, quiet, and dedicated space. A neat atmosphere focuses the viewer’s attention on you, not the distractions around you.
5. Troubleshooting Common Webcam Issues
Web camera setups aren’t always perfect from the start. Here are some common issues and how to solve them:
- Webcam Not Detected: Ensure the webcam is properly plugged in, and check your device’s privacy settings to make sure your streaming software has permission to access the camera.
- Lagging Webcam Feed: If your webcam video is freezing or running slowly, try lowering the resolution or frame rate in your webcam settings. Also, make sure other applications aren’t consuming too much CPU or bandwidth.
- Audio Sync Issues: If your webcam feed is out of sync with the audio, adjust the audio delay in your streaming software until the two are aligned.
Conclusion
Setting up a webcam for live streaming doesn’t have to be complicated. By following these steps, you can improve the quality of your streams and connect with your audience more personally and professionally. Whether you’re starting or upgrading your setup, the right webcam and settings make a big difference.
Remember to experiment and adjust until you find the perfect setup. If you’re new, take it one step at a time, and soon you’ll be streaming like a pro!
What webcam are you using for streaming? Share your tips or let us know in the comments below!
Frequently Asked Questions (FAQs)
Here are answers to some of the most common questions about how to use a webcam for live streaming :
To set up your webcam for streaming, start by plugging it into your computer’s USB port. Open your streaming software (like OBS) and add your webcam as a Video Capture Device in the Sources section. Position it correctly, adjust settings like exposure and white balance, and you’re ready to go live!
Some popular webcam streaming websites include YouTube Live, Twitch, and Facebook Live. These platforms allow you to stream live directly from your webcam and engage with your audience in real time. There are also specialized streaming websites like StreamYard for professional setups.
When using dual monitors, place your webcam between them, ideally at eye level. This helps you stay visible on camera while keeping your attention on the content displayed on your monitors. Avoid placing it off to the side, as this can break the flow of your interaction with the audience.
It depends on your needs. A webcam like the Logitech C920 is more affordable, easy to set up, and works well for most streamers. However, a DSLR or mirrorless camera offers better image quality, greater control, and more flexibility, but it requires additional equipment like a capture card.
Yes, you can use a webcam for live gaming streams. Make sure to position the webcam so that viewers can see your face while you’re playing. Pairing your webcam with game footage allows for a more engaging, personal experience for your audience.


- Be Respectful
- Stay Relevant
- Stay Positive
- True Feedback
- Encourage Discussion
- Avoid Spamming
- No Fake News
- Don't Copy-Paste
- No Personal Attacks
- Be Respectful
- Stay Relevant
- Stay Positive
- True Feedback
- Encourage Discussion
- Avoid Spamming
- No Fake News
- Don't Copy-Paste
- No Personal Attacks
