How to Set Up a Logitech Webcam on Windows (7/8/10/11)
Published: 16 Sep 2025
Setting up your Logitech webcam on Windows isn’t a complicated process. Whether you’re working remotely, streaming your favourite game, or catching up with friends on a video call, this guide will show you the easy steps to set up a Logitech webcam quickly. Don’t worry, we’ve got everything you need—let’s get started!
System Requirements for Logitech Webcam Installation
Before you start, let’s make sure your system meets the basic requirements. Here’s what you’ll need:
- Operating System: Windows 7, 8, 10, or 11.
- USB Ports: At least one available USB 2.0 or higher port.
- Internet Connection: For downloading the necessary software and drivers.
- Disk Space: Around 200MB (varies depending on the webcam model).
Once you’ve prepared everything, you’re ready to go!
How to Install a Logitech Webcam on Windows: Step-by-Step Instructions
Installing your Logitech webcam on Windows is easy! Just follow these step-by-step instructions to get started right away.
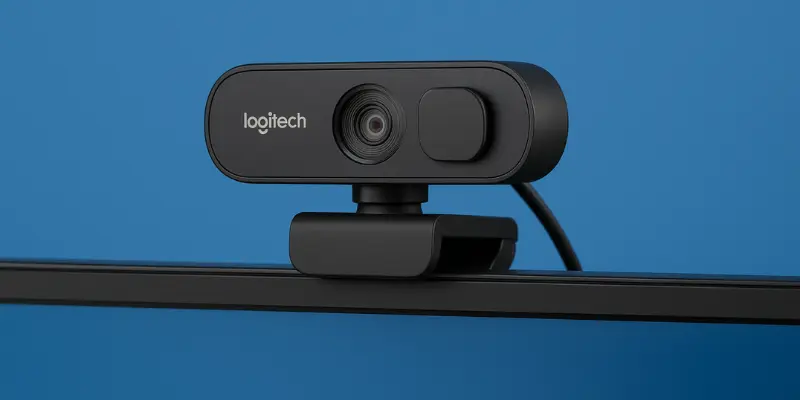
Step 1: Unbox and Prepare Your Webcam
The first step is unboxing your Logitech webcam. Inside the box, you’ll find:
- The webcam
- Privacy shutter (optional but handy for privacy)
- USB cable for connection
- Quick start guide (you can refer to this anytime if needed )
Take the webcam and attach the privacy shutter (if included). Next, position the webcam on top of your monitor, or wherever you plan to use it. Make sure it’s at a good angle for video calls or streaming.
Step 2: Connect the Webcam to Your Computer
Now, let’s plug the webcam in. It’s that easy!
- Plug the USB cable from your Logitech webcam into an available USB port on your computer.
- If you’re using Windows 11, 10, or 8, there’s no need to install additional software or drivers. These versions of Windows should automatically detect and install the necessary drivers for your Logitech webcam.
However, if you’re using Windows 7, you may need to manually download the drivers. To do this, visit Logitech’s Webcam Support site, select your model, and download the software.
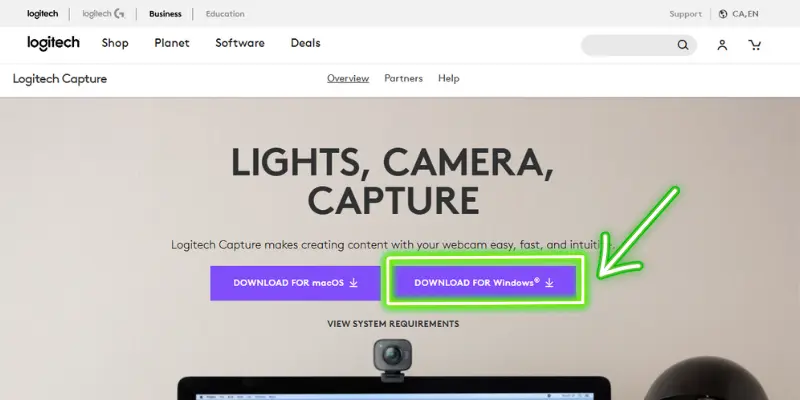
Step 3: Install Logitech Software (Optional)
For better functionality and customization, you can download Logitech Capture. This tool allows you to:
- Adjust camera settings like brightness and contrast.
- Zoom in or out if your model supports it.
- Access advanced features like background blur or stream settings.
To download the software:
- Go to the official Logitech Support website.
- Search for your webcam model (e.g., Logitech C920e, C270).
- Click the “Downloads” tab and choose the software compatible with your Windows version.
- Follow the installation prompts.
Step 4: Test Your Webcam
Now that your webcam is connected and the software is installed, it’s time to test it!
- Open the Camera App: Type “Camera” in the Windows search bar, and click on the app. If your webcam is working, you should see the live feed from the camera right away.

- Test in Video Conferencing Apps: You can also test your webcam with popular applications like Zoom, Skype, or Microsoft Teams. Simply open one of these apps, go to Settings, and select your Logitech webcam as the video source.
| 👉Tip: |
|---|
If you want a more detailed webcam test, try using our free online tool: Webcam Test Tool. |
Troubleshooting Common Issues
Even after setup, your Logitech webcam might not work as expected. Don’t worry—most issues are easy to fix. Here are common problems and solutions:
1. Webcam Not Detected
If your computer doesn’t recognise the webcam, try the following steps:
- Check the USB connection: Make sure the USB cable is securely plugged in. Try a different USB port on your computer.
- Restart your computer: Sometimes a quick reboot can solve the issue. After restarting, reconnect the webcam.
- Install correct drivers: For Windows 7 users, ensure that you’ve downloaded and installed the required drivers from the Logitech website.
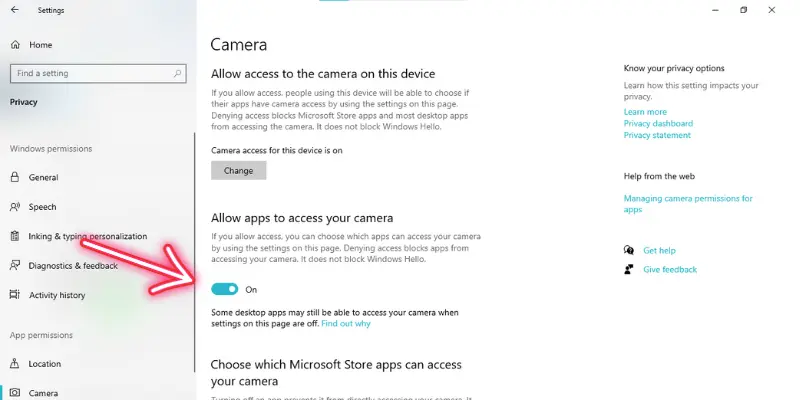
- Check Windows privacy settings:
- Go to Settings → Privacy & Security → Camera.
- Make sure Camera Access is turned ON.
- Scroll down and allow apps like Zoom, Skype, or Microsoft Teams to access the webcam.
2. Poor Video Quality
If your video looks blurry or too dark:
- Clean the camera lens gently with a microfiber cloth.
- Open the Logitech Capture software to adjust brightness, contrast, and resolution.
- Ensure you have good lighting in the room. Natural light or a simple desk lamp can make a huge difference.
3. Audio Not Working
Some Logitech webcams come with built-in microphones. If the mic isn’t working:
- Check microphone settings: Go to Settings → System → Sound → Input and select your Logitech webcam as the default device.
- Verify app permissions: Go to Settings → Privacy & Security → Microphone and ensure microphone access is ON for apps like Zoom, Skype, or Teams.
- Test the microphone: Use the Voice Recorder app or Zoom’s audio test to check if sound is being picked up.
Advanced Settings and Features
Once your Logitech webcam is installed and working, you can explore advanced settings to improve your video experience. These features give you more control over how you look on camera and how your webcam performs.
1. Logitech Capture Software
Logitech Capture is an optional tool that lets you:
- Record high-quality videos directly from your webcam.
- Add text overlays, transitions, and scene effects.
- Use multiple sources (like screen + webcam) for streaming.
2. Background Effects
Some Logitech webcams support background blur or replacement.
- Open Logitech Capture or your meeting app (Zoom/Teams).
- Go to Video Settings → Background Effects, then choose Blur or a custom image.
3. Resolution and Frame Rate
Depending on your webcam model, you can switch between resolutions and frame rates for smoother video or sharper quality.
- Open Logitech Capture/Camera Settings → Video Settings.
- Select your preferred resolution (720p/1080p) and frame rate (30fps/60fps).
4. Using Logitech G HUB (For Streamers)
If you’re a gamer or streamer, Logitech G HUB software allows you to:
- Sync your webcam settings with Logitech headsets, mice, and keyboards.
- Customise lighting and overlays for a professional stream setup.
👉 With these advanced features, you can turn your basic webcam setup into a professional-looking video experience.
Conclusion
Now that you know how to install a Logitech webcam on Windows, you’re all set to enjoy clearer video calls, smoother streams, and better online meetings. With the right setup and advanced settings, your webcam can deliver professional-quality results. And if you run into issues, just follow the troubleshooting steps to get back on track quickly.
FAQs (Frequently Asked Questions)
Here are answers to some of the most common questions about how to install a Logitech camera:
Yes, Logitech Capture is free software that you can download from Logitech’s official website. It provides advanced features like background effects, video recording, and streaming integration.
The steps are the same as for Windows 7, 8, or 11. Just plug in the webcam, and Windows should automatically install the necessary drivers. You can also download Logitech’s software for additional features.
Yes, the Logitech C270 is compatible with Windows 7. You may need to manually install the drivers from the Logitech Support website. Once installed, the webcam should work seamlessly for video calls and streaming.
Visit Logitech’s official website, search for your webcam model, and download the latest drivers for your operating system.
To add your Logitech webcam to OBS:
- In OBS, click the “+” under Sources and select Video Capture Device.
- Choose your Logitech webcam from the list.
- Adjust settings, then click OK to add it to your scene.


- Be Respectful
- Stay Relevant
- Stay Positive
- True Feedback
- Encourage Discussion
- Avoid Spamming
- No Fake News
- Don't Copy-Paste
- No Personal Attacks
- Be Respectful
- Stay Relevant
- Stay Positive
- True Feedback
- Encourage Discussion
- Avoid Spamming
- No Fake News
- Don't Copy-Paste
- No Personal Attacks
