How to Set Up Logitech Webcam on Mac in Minutes
Published: 24 Sep 2025
Installing a Logitech webcam on your Mac is easier than you might think. Whether you’re setting up for a video call, streaming, or recording, this article will guide you through each step.
We’ll cover everything from unboxing your webcam to getting it ready to use, along with common issues and how to fix them. By the end, your Logitech webcam will be set up and ready to go without any hassle.
System Requirements for Logitech Webcams on Mac
Before we get started, let’s make sure your Mac is ready to go. Here’s what you’ll need:
- macOS Version: Most Logitech webcams work with macOS 10.10 and newer. If you’re using a significantly older version of macOS, it might be time for an upgrade.
- USB Port: Make sure your Mac has an available USB 2.0 or 3.0 port. USB-C users may need an adapter, depending on the webcam model.
- Software: While macOS typically recognizes Logitech webcams automatically, downloading and installing the latest drivers and software from the Logitech website ensures you get the full functionality and access to all features.
How to Install a Logitech Webcam on Mac
Setting up your Logitech webcam on a Mac is quick and easy! Once your Mac meets the system requirements, just follow these simple steps to set up your webcam.
Step 1: Unbox and Position Your Logitech Webcam
Now, let’s unbox and position your Logitech webcam!
- Open the package carefully, and take out the webcam and the attached USB cable.
- Depending on your webcam model, you might find a quick-start guide or product manual. It’s always a good idea to read through it to familiarize yourself with the webcam’s features, although we’ll guide you through the main setup process.
- Remove any protective coverings from the camera lens to make sure you’re all set to plug it in.
- Place the webcam on top of your Mac’s screen or laptop, ensuring it is centered and positioned at eye level for the best angle during video calls or streaming. Use the adjustable clip to secure the webcam in place without damaging the screen.
You May Also Like This Post
➡️ How to Record a Video with a Webcam
➡️ How to Take a Photo with a Webcam
➡️ How to Look Better on Webcam
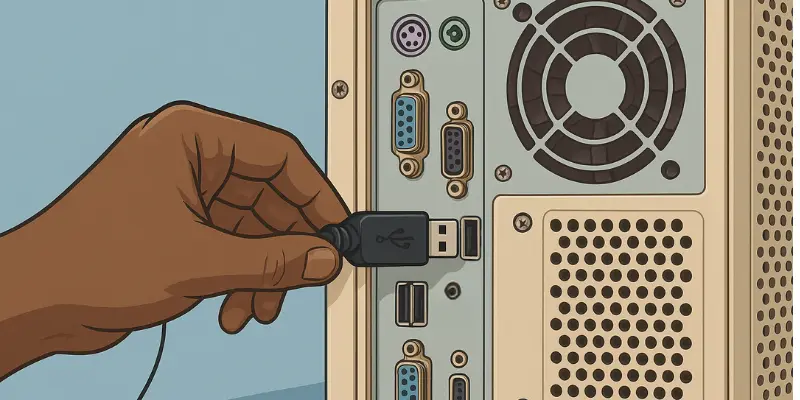
Step 2: Connect the Webcam to Your Mac
This part is simple—connect the USB cable from your Logitech webcam to an available USB port on your Mac.
- Tip: If your Mac only has USB-C ports, you’ll need a USB-A to USB-C adapter. These are inexpensive and easy to find online or at your local electronics store.
Once connected, macOS will usually recognize the webcam right away. If not, try restarting your Mac or downloading the latest drivers from the Logitech support page.
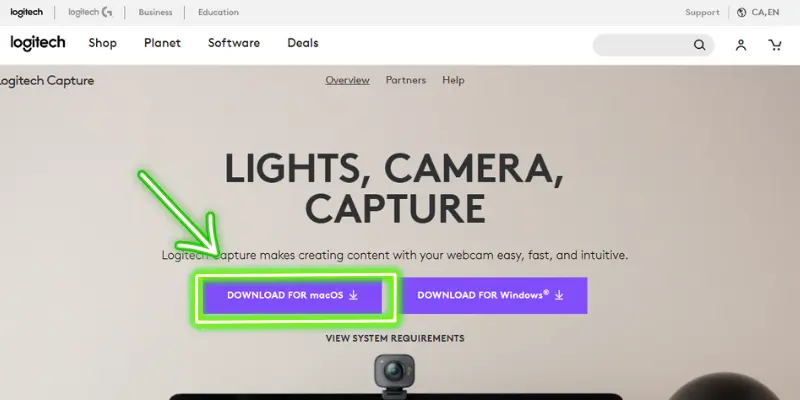
Step 3: Install Logitech Webcam Software (Optional but Recommended)
While your webcam might work right out of the box, installing the latest Logitech webcam software ensures that you get the best experience. It gives you access to advanced features, camera settings, and firmware updates.
Here’s how to install the software:
- Go to Logitech’s Official Support Page: Visit Logitech’s support site and search for your webcam model.
- Download the Latest Software: Choose the software that matches your Mac’s operating system.
- Install the Software: Follow the on-screen instructions to install it. Once installed, you can access it from your Applications folder or System Preferences.
Step 4: Test Your Webcam
Now it’s time to test your Logitech webcam!
- Open the Camera app: Open the Launchpad from the Dock by clicking the rocket icon, then type “Photo Booth” in the search bar and select it to launch the app.
- If you see yourself on screen, you’re all set! If not, make sure the webcam is selected as the video source in the app’s settings.
You can also test your webcam in third-party apps like Zoom, Skype, or Google Meet. Simply open one of these apps, go to Settings, and select your Logitech webcam as the video source.
| 👉Tip: |
|---|
If you want a more detailed webcam test, try using our free online tool: Webcam Test Tool. |
Troubleshooting Common Issues
If you’re facing issues with your Logitech webcam on your Mac, don’t worry! Here are some common problems you may encounter, along with easy fixes to get you back on track:
Logitech Camera Not Detected:
If your Mac doesn’t recognize the webcam, try these steps:
- Unplug the webcam and plug it back in.
- Restart your Mac and check the connection again.
- Make sure the latest drivers are installed.
Video Not Working in Apps:
If you’re having trouble with video in apps, here’s how to fix it:
- Open your app’s settings (e.g., Zoom, FaceTime) and manually select your Logitech webcam as the video source.
- If you’re using a video conferencing app, make sure it’s up to date.
Low Video Quality:
If the video quality is lower than expected, try these adjustments:
- Open the Logitech Software Camera Settings and increase the resolution.
- Ensure you have good lighting in your room for optimal video quality.
Webcam Freezing:
If your webcam freezes during use, follow these steps:
- Disconnect and reconnect the webcam.
- Check for software updates and ensure macOS is updated to the latest version.
Additional Tips and Settings
To make the most out of your Logitech webcam, here are a few extra tips and settings you can adjust for streaming, video calls, and showing yourself at your best on screen:
1. Optimize Your Streaming Setup
If you’re using your webcam for streaming, ensure that:
- Set the correct resolution: For streaming, set the resolution to 1080p for the best video quality. You can adjust this in the Logitech Camera Settings software.
- Choose the right frame rate: Most webcams work well with a 30fps frame rate, but if you’re doing fast-action streaming (like gaming), go for 60fps for smoother motion.
2. Position Yourself for the Best Angle
The right positioning can make a huge difference in how you look on camera:
- Position the webcam at eye level: This gives a natural and attractive angle for video calls or streaming.
- Center yourself in the frame: Make sure you’re positioned in the middle of the screen for a balanced view.
- Consider the background: Keep the background tidy and neutral. A clean or blurred background keeps the focus on you during video calls.
3. Adjust Lighting for Better Visibility
Lighting is key to making you look your best on camera:
- Use soft, diffused lighting: Try to use a soft light source in front of you (e.g., a ring light or a desk lamp). Avoid harsh lights or backlighting, which can make you look dark or washed out.
- Position lights at a 45-degree angle: This gives even lighting without creating shadows on your face.
4. Adjust Camera Settings
Use the Logitech Capture software to optimize your webcam’s performance:
- Increase the resolution: Set it to 1080p for the clearest video quality.
- Adjust exposure and white balance: This ensures your skin tone looks natural and that you’re visible in various lighting conditions.
- Enable autofocus: If your webcam supports it, enable autofocus to keep you sharp and in focus at all times.
Conclusion
Now that you know how to install and set up a Logitech webcam on your Mac, you’re ready to enjoy smooth video calls, streaming, and recordings. From unboxing to testing, the process is simple and takes only a few minutes. With the right setup and a few adjustments to lighting and settings, you’ll look and sound your best in every meeting or live session.
FAQs (Frequently Asked Questions)
Here are answers to some of the most common questions about how to install a Logitech camera on Mac:
The process is exactly the same! Simply follow the steps to set up your Logitech webcam on your MacBook Pro. Just ensure your MacBook Pro meets the system requirements, and you’re good to go!
Try unplugging the webcam and reconnecting it. Restart your Mac and check if the webcam is recognized. If it’s still not working, visit Logitech’s support site to reinstall the drivers.
No, your Logitech webcam should work right out of the box. However, installing the latest software gives you access to advanced features like camera settings and firmware updates. It’s recommended for the best experience.
If your MacBook Air only has USB-C ports, you’ll need a USB-A to USB-C adapter. These are inexpensive and easy to find online or at electronics stores. Once you have the adapter, you can connect your webcam and start using it right away.


- Be Respectful
- Stay Relevant
- Stay Positive
- True Feedback
- Encourage Discussion
- Avoid Spamming
- No Fake News
- Don't Copy-Paste
- No Personal Attacks
- Be Respectful
- Stay Relevant
- Stay Positive
- True Feedback
- Encourage Discussion
- Avoid Spamming
- No Fake News
- Don't Copy-Paste
- No Personal Attacks
