Set Up Your Live Webcam for Streaming, Calls & Remote Work
Published: 12 Mar 2025
Live webcams have become a key tool in today’s digital world. Whether it’s for video calls, live streaming, remote work, or even online teaching, learning how to set up a live webcam correctly can make a big difference in your experience and output. In this article, I will guide you through everything from webcam setup to live webcam streaming, whether you’re using it for professional meetings, gaming, or personal projects. So, let’s get started
2. Why You Need a Live Webcam Setup
A webcam setup isn’t just about plugging in a camera. It is about providing clear video quality and smooth communication. Here’s why setting up your webcam properly is important for every use case.
- Webcams for Streaming: If you want to stream on platforms like YouTube or Twitch, a good webcam setup is essential to keep your audience engaged.
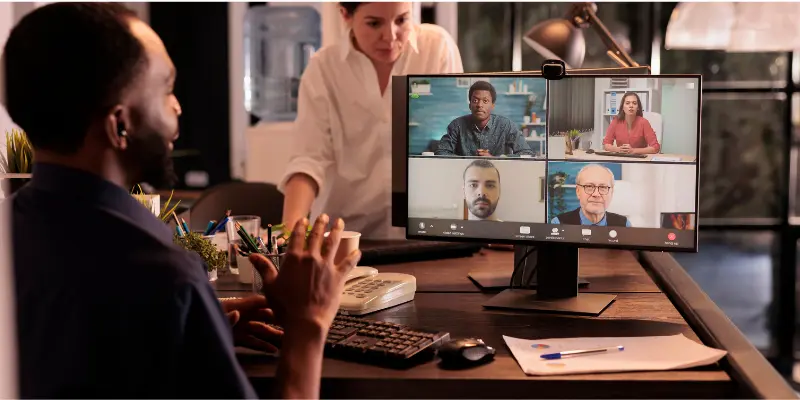
- Webcams for Video Calls: Whether you’re using Zoom, Skype, or Google Meet, the quality of your webcam can affect how clearly people see and hear you.
- Webcams for Remote Work: In today’s world, many jobs require video meetings. A proper webcam setup ensures that you come across clearly and professionally.
A well-set-up webcam improves the quality of your live webcam video and makes your communication more effective.
3. What You’ll Need to Get Started
To get the best results, you’ll need the right equipment and software. Let’s see what you’ll need to get started.
Hardware Requirements:
To get the best webcam performance, you need the right hardware. Let’s explore the essential equipment.
Webcam Types:
Choosing the right type of webcam depends on your needs, whether for streaming, video calls, or professional meetings.
- External Webcams: These are great for streaming or video calls, offering higher quality and flexibility.
- Built-in Webcams: Most laptops have these, but they may not offer the best quality for streaming.
Additional Equipment:
To improve your webcam experience, consider adding these accessories for better video and audio quality.
- Lighting: Proper lighting is key for a crisp, clear video. Consider LED ring lights or softboxes.
- Microphones: A good microphone ensures your audio is as clear as your video.
- Webcam Mounts: A mount or tripod holds your camera steady and at the proper angle.
Software Requirements:
Besides hardware, the right software plays an important role in achieving high-quality video output.
- Streaming Software: Programs like OBS and Streamlabs are great for setting up live webcam streaming.
- Video Calling Platforms: Platforms like Zoom, Skype, and Google Meet are essential for remote work.
- Free vs. Paid Options: Some tools are free, like OBS for streaming, while others, like Streamlabs and XSplit, require a paid membership for additional features.
How to Set Up a Live Webcam
Now that you have everything ready, let’s walk through the step-by-step process of setting up your webcam to get the best results.

Step 1: Unboxing and Connecting the Webcam
Unbox your webcam and connect it to your computer using USB or Bluetooth.
- Most webcams will be plug-and-play, but you may need to install drivers for some models.
Step 2: Adjusting Your Webcam Settings
Adjusting your webcam’s settings is crucial to ensure you look best on camera:
- Resolution: Set your webcam to the highest resolution possible (at least 720p or 1080p).
- Focus: Adjust the focus to make sure you’re clear on camera.
- Frame Rate: For smooth video, set your frame rate to 30fps or higher.
- White Balance: Adjust for proper lighting and to avoid a yellow or blue tint.
Step 3: Positioning Your Webcam
Positioning your webcam correctly is key to looking natural and professional during video calls or streams:
- Position the webcam at eye level for a more natural look during video calls.
- Avoid placing the webcam too high or too low, which can result in awkward angles.
- For streaming, make sure your face is well-lit and centered.
Step 4: Choosing the Right Lighting
Lighting is everything when it comes to webcam quality. Here’s how to make sure your lighting is on point:
- If possible, use natural light or professional lighting kits to improve the image quality.
- Avoid harsh backlighting or shadows on your face.
Step 5: Configuring Audio Settings
Audio matters as much as video, especially for streaming or video calls:
- Use an external microphone to get clear audio, especially if you’re live streaming.
- Adjust the audio settings in your software to reduce background noise and improve clarity.
Webcam Setup for Different Use Cases
Depending on how you plan to use your webcam, here’s how you can optimize it for specific needs.
For Video Calls:
- Zoom, Skype, and Google Meet are the top video conferencing platforms.
- Make sure your webcam is properly set up for clear video and crisp audio to ensure smooth communication.
For Live Streaming:
- Whether you’re streaming on YouTube, Twitch, or Facebook, a solid webcam setup is essential.
- Follow the steps above to ensure your webcam is streaming at optimal quality.
You may also like these Posts:
👉 Webcam Setup for Streaming Like a Pro – Ultimate Guide
For Online Classes:
- Position your webcam so students can see your face clearly, and adjust the lighting for a better experience.
- Use software like Zoom or Google Meet to connect with your student
You may also like these Posts:
👉 Set Up Webcam for Zoom Meeting: Quick & Easy Guide
Troubleshooting Common Webcam Issues
If your webcam isn’t working as expected, here are some common issues and quick fixes.
- Webcam Not Recognized: Make sure the webcam is properly connected. If using an external webcam, try reconnecting it to a different USB port. If the issue persists, reinstall or update your webcam drivers.
- Poor Video Quality: Check the camera’s resolution and frame rate settings. Ensure you’re using proper lighting, as poor lighting can drastically reduce video quality. If needed, adjust the camera’s settings for focus and white balance.
- Audio Desync: If audio and video aren’t syncing, restart both your webcam and microphone. In streaming software, check the settings to ensure audio and video sources are synced correctly.
- Webcam Freezing or Lagging: Restart your computer or webcam or reduce the resolution for smoother performance.
Testing Your Webcam Setup
Before you start your video call, online class, or livestream, it’s important to test your webcam. Here’s how to make sure everything works smoothly:
1. Test Your Webcam
Make sure your webcam is working before you begin.
- On Windows: Click the Start button → Type “Camera” → Press Enter.
- On macOS: Open Finder → Go to Applications → Double-click Photo Booth.
- Online Tool: Go to Webcam Testing Tool → Click Test My Cam → Allow the site to access your webcam.
3. Check Your Lighting
Good lighting makes a big difference! Here’s how to get it right:
- Sit facing a light source like a window or lamp.
- Avoid strong lighting behind you because it can make your face appear dark.
4. Test Your Audio
Clear sound is just as important as a clear picture. Here’s how to check:
- Speak normally and listen for any echo or noise.
- If you hear anything strange, adjust your microphone settings.
Conclusion
By following these steps, you’ll know exactly how to set up a live webcam for high-quality streaming, video calls, and remote work. Remember to test everything before going live for the best experience.
I’d love to hear about your webcam setup. Feel free to share your experiences in the comments below! And don’t forget to subscribe for more tips on setting up a live webcam and streaming.
Frequently Asked Questions (FAQs)
Here are answers to some of the most common questions about live webcam setup:
To make your webcam live, you need to use a streaming platform or video-calling software. For streaming, connect your webcam to software like OBS or Streamlabs, then link it to platforms like YouTube or Twitch. For video calls, simply open a platform like Zoom or Skype and start your call, and your webcam will go live automatically.
For streaming, an external webcam with at least 1080p resolution and 30fps is recommended. It provides better video quality and flexibility. Make sure to choose a webcam with auto-focus and good low-light performance.
While built-in webcams can work for video calls, they may not provide the best quality for streaming. External webcams usually offer higher resolution and better performance. If you’re serious about streaming, an external webcam is a better choice.
Yes, webcams are great for online teaching. Position your webcam at eye level, and ensure your lighting is good for clear video. Using video calling platforms like Zoom or Google Meet works well for connecting with students.


- Be Respectful
- Stay Relevant
- Stay Positive
- True Feedback
- Encourage Discussion
- Avoid Spamming
- No Fake News
- Don't Copy-Paste
- No Personal Attacks
- Be Respectful
- Stay Relevant
- Stay Positive
- True Feedback
- Encourage Discussion
- Avoid Spamming
- No Fake News
- Don't Copy-Paste
- No Personal Attacks
